Migrating from Bearblog to Mataroa
With the power of BashBeing able to migrate our data freely between open platforms is all well and good in theory, but when every service uses its own opinionated data format, it can feel like the option might as well not even be there. What good is all this data if no two sites speak the same language?
Well, here’s one translation. I don’t figure the number of people in need of this guide is very large, but if you’re one of those people, I hope you can benefit from what I learned. This guide relies on bespoke tools that others have made; if these tools are made unavailable in the future, I’ll update this post with the bad news. For the moment, this process, convoluted though it may be, works.
Step 0: download your bearblog archive
Before you begin, it’s prudent to save a backup of your bearblog
archive in its current form in case anything goes wrong. Go to your
bearblog settings page at
https://bearblog.dev/<your subdomain>/dashboard/settings/
and click “export all blog data”. This will give you a file called
post_export.csv. This is your archival copy: keep it safe
and back it up like you would any private data you don’t want to
lose.
Step 1: clean up your bearblog archive
This process will migrate your entire bearblog catalog to
mataroa, including drafts and pages that may not be intended for the
public. If there’s anything you don’t want to migrate, now is the
easiest time to deal with it. You can delete posts you don’t want to
keep, or to preserve them, you can set the published date to the year
3000 or something. This will make them scheduled posts on mataroa, not
visible to the public,I’ve since learned that
drafts and scheduled posts on mataroa are visible to anyone who knows
the URL, they’re just not indexed. So if you keep your sensitive data in
a post with a simple URL like nudes, it’s possible for
someone to access these posts by guessing. Exercise
caution. so you can deal with them at your leisure.
Step 2: download your bearblog archive
Go to your bearblog settings page at
https://bearblog.dev/<your subdomain>/dashboard/settings/
and click “export all blog data”. This will give you a file called
post_export.csv. This is your working copy, the archive
that will be copied in its entirety (sans tags and other unsupported
metadata) to mataroa.
Step 3: fix the date stamps
Mataroa’s API will only accepts posts with a published date in
YYYY-MM-DD format. Bearblog dates also include a timestamp.
We need to fix this.
Open post_export.csv in an editor that supports
find-and-replace with regular expressions. gedit works fine for this
purpose.
Open the find-and-replace dialogue (Ctrl-H in gedit) and make sure regular expression search is enabled. In the “find” field, paste this:
T\d\d\:\d\d\:\d\d(\.\d\d\d\d\d\d\+\d\d\:\d\d|\+\d\d\:\d\d)Leave the “replace” field blank and click Replace All. This
will strip the time from each of the date stamps, leaving only the date
in YYYY-MM-DD format. Save the file and close the
editor.
Step 4: convert your archive to JSON
I used a tool called nanuq. Go to mgx.me/nanuq.
Under customize headers, change “published date” to “published_at” and “content” to “body”. Leave all the other fields unchanged.
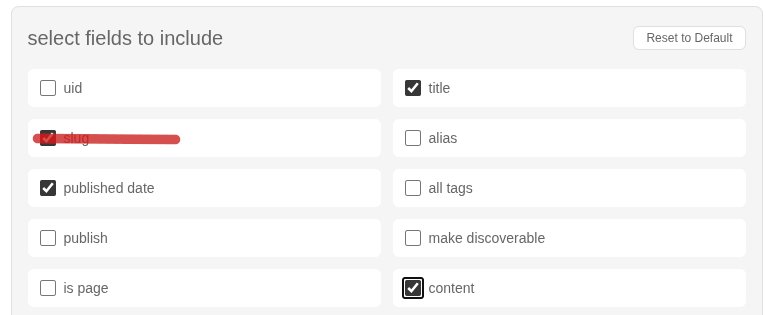
Bear uses a lot of metadata that’s not applicable to mataroa, so under select fields to include, the only boxes that should be checked are title, published date and content.
Scroll down to export options. Click choose
file and find the post_export.csv file you got from
bearblog. Click export JSON.
Nanuq will then give you a file called
post_export.json.
Step 5: Split the JSON file
The mataroa API unfortunately doesn’t let you import multiple posts
in one .json, so you’ll need to split it up. This can be
accomplished with a core Linux utility called csplit.
csplit can only split a file at lines, not at a specific
character. So the first thing you need to do is use sed to
make sure the ending delimiter, }, is on its own line.
Here’s the command:
sed 's/\},/\n\}\n/g' post_export.json > post_export2.json
This will remove the superfluous comma and split the JSON file into 2
lines each: one line for the post, and one line for the }.
The new data will be saved as post_export2.json.
Now you can use csplit to split this into multiple
files:
csplit --keep-files --prefix=post --digits=3 post_export2.json $'/\}/+1' '{*}'
This will create post001, post002 etc. (the
file extension isn’t actually necessary for the import process.) Again,
if you have a 2-digit number of posts, change it to
--digits=2.
Your original post_export.json was an array, and thus
contained inside [square brackets]. Open post001 and remove
the [, then save the file. Do the same with your last post
and ].
Step 6: find your mataroa API key
Go to the mataroa API docs
page. At the top, you should see your API key, a long string of
letters and numbers like 0a1b2c3d4e5f6a7b8c9d0e1f2a3… If
you don’t, make sure you’re logged in. Have this key ready for the next
step.
Step 7: import your posts
Navigate to the folder where you saved the split .json
files in step 5. Create a new text file for a bash script. I called mine
import.sh.
Copy and paste this script into the file:
for i in {000..999}
do
    json="@post"$i
    curl -X POST \
    -H 'Authorization: Bearer <api_key>' \
    -d $json \
    https://mataroa.blog/api/posts/
    sleep 5
done
Replace 999 with the number of posts you’re going to
import. If you have a two-digit number of posts, remove one of the
leading zeroes, for example {01..99} (if you have a
single-digit number of posts, you probably don’t need this guide!)
Replace <api_key> with the key you found in step
6.
Save the script. Make it executable with
chmod +x import.sh. Start the script by typing
./import.sh.
The script will begin importing your posts with the mataroa API. There will be a 5 second pause between each request so as not to hammer the server. Wait for it to finish. Your blog is now migrated!
Problems
The only issue I noticed is that I got an “invalid data” error with a
few posts towards the end of the process. Turns out that for some
reason, quotation marks in the body of the post weren’t escaped. I don’t
know if this originates with the bear blog export itself or the
.json conversion. It’s easy enough to fix: place a
backslash before any quotation mark in the body field
\"like this\". Considering this only happened to like 4
posts out of nearly 400, I think it did a pretty good job.
Please let me know if this helped! It took me hours to put this all together, so I hope this guide is useful to someone.
This is a condensed version of two blog posts from Oct 22 & 25, 2025. Comments? See the original blog post. Thanks again to Lisa for her suggestions.